Top Ten Ways of Improving Newtonian Telescope Optics
Top Ten Ways of Improving Newtonian Telescope Optics
by Dick Suiter
The Newtonian has a single curved mirror as the focusing element, and is the most common type of telescope among amateurs. The reason for this is simple; the Newtonian is the most inexpensive type of quality telescope. (See the telescope recommendations section under the main page.)
I'm not claiming precedence in coming up with the items in these recommendation. I'm sure that others have thought of all of them first, although they may emphasize things differently or neglect elements. The way I've ordered them has nothing to do with effectiveness. It has to do with obscurity. Number 10 (testing optics) is painfully obvious. Numbers 1 and 2 are less so.
10) Star test your optics
9) Learn to accurately align
8) Get a decent Barlow lens, eyepieces, and finder
7) Don't reduce diagonal minor axis indiscriminately
6) Check the baffling of your Barlow lens (this works for any telescope)
5) Take extra care to darken the other side of the tube
4) Make spider blades as thin as possible
3) Lengthen the tube
2) Mask the edge of the mirror
1) Baffle the focuser tube
- 10) Star test your optics
- Testing your optics to confirm quality is obvious. What is less straightforward is the way of testing. Telescope makers can use a variety of techniques, but ordinary telescope users find that learning a workshop method is difficult. They have only one mirror that doesn't change, so it is easier to test it on the sky. The star test is a good way of evaluating instruments for one-time users.
You must be careful to test the instrument when it has cooled off and is under fairly tranquil skies, as the spherical aberration with strong turbulence figure shows. The aberration types figure shows some common difficulties with telescope optics.
See Willmann-Bell for a book with full instructions about how to do this test.
- 9) Learn to accurately align
- A brief abstract of the procedure follows:
1) Cut the bottom out of a clear 35-mm film can and poke a hole in the center of the lid.
2) Permanently mark a dot at the center of the primary mirror.
3) Place the sighting hole in the focuser in the place of an eyepiece.
4) Make sure the focuser is at right angles to the tube.
5) Looking from the focal plane, center the diagonal at the bottom of the focuser tube.
6) Orient the diagonal so that the primary mirror is centered.
7) Tilt the primary mirror so that the dot reflects back atop the sighting hole.
8) Tweak alignment with the star test.
- 8) Get a decent Barlow lens, eyepieces, and finder
- If you have a limited amount of cash, buy your eyepieces in dribbles, but buy quality. Obtain not only a reflex (unit power) finder but a large magnifying finder. I don't recommend a mirror-image diagonal finder. It flips the maps. If you use a right-angle finder, use a roof-prism or some other sophisticated diagonal that doesn't flip the image right-to-left. If you can't find an object, you can't observe it, no matter how good your optics.
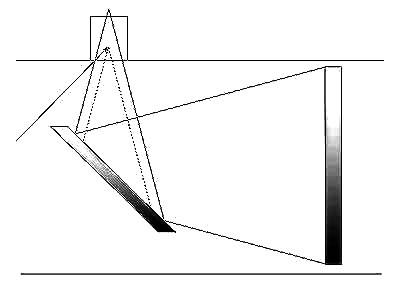
- 7) Don't reduce diagonal minor axis indiscriminately
- The present-day accepted wisdom says that the absolute minimum-size diagonals and the associated squatty focusers are necessary for optical quality. This combination has two disadvantages, however. As the diagonal figure shows, lower focus (dotted line optical path) does allow a smaller diagonal, but it also allows stray light to the focal plane (the focuser becomes impossible to baffle). Also, a minimum-sized diagonal mirror must be used right up to its edge. Often, flats are of lower quality near the edges.
- 6) Check the baffling of your Barlow lens
- Many Barlows are not baffled well. Some are lined only with threading. Others are completely without baffling. For the majority of objects, this really matters little. For objects with other bright objects nearby, however, the extra unfocused light can be annoying. If necessary, you should install a shallow ring in your Barlow (see Barlow figure) to shade the hatched region from the 100 percent illuminated region.
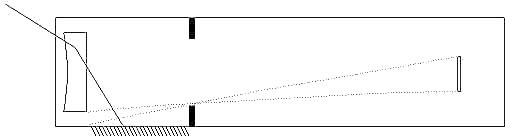
- 5) Take extra care to darken the other side of the tube
- You should take special care to blacken the elements directly visible through the focuser tube. This includes the other side of the tube and the near side of the diagonal. In the opposite side figure, a tube-baffle semicircle is also show just inside the spider. While most tube baffling is a waste of effort in Newtonians, this lip is useful on one object -- the moon. It keep glancing-incidence moonlight from lighting the other side of the tube. It doesn't have to be very high, just occupy a half degree from the other side of the region in direct view. A tenth of an inch will cover a foot.
- 4) Make spider blades as thin as possible
- A thin spider is better than a thick one because it intercepts less light, and hence has a lower cross-section for scattering. But even thin spiders can be misadjusted. As the spider figure shows, a thin vane with an unusual tilt looks like a thick one.
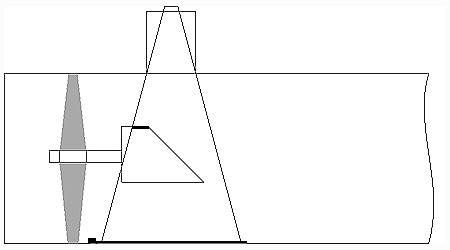
- 3) Lengthen the tube
- People often construct stubby, chopped-off tubes. They do it for good reason. Maybe the telescope won't fit in the car otherwise. Nevertheless, you should try to ensure that the tube extends beyond the focuser by at least its own diameter (this also work for BELOW the focuser in open-tube Newtonians). Use a dew shield to extend existing tubes, as shown in the tube extension figure.
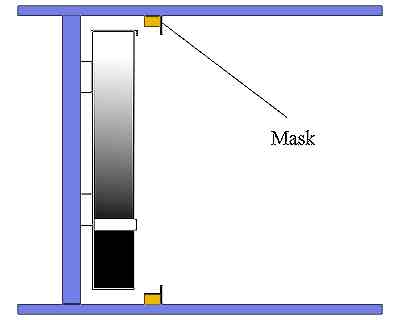
- 2) Mask the edge of the mirror
- The worst portion of the average Newtonian telescope mirror is the edge. One thing that you can try is to cover the last quarter inch or so with a circular mask. If it doesn't help, the masking can always be undone, but judging from the mirrors I've inspected, masking will more often help than not. See the masking figure for placement just forward of the mirror. Be sure that the front of the mask is velvety black.
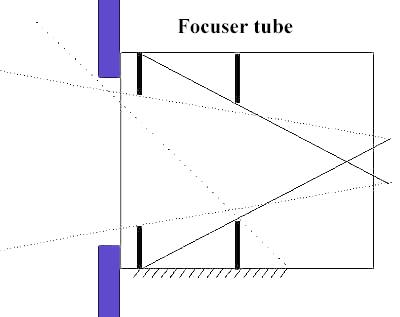
- 1) Baffle the focuser tube
- The focuser baffling figure shows the most neglected surface of a telescope, the inside tube of the focuser. A 2-inch focuser is the easiest to baffle, and it should not be too short. One baffle should be placed near the bottom, only large enough to allow light from the diagonal to cover the entire region of 100-percent illumination. Another baffle should be placed somewhat above, to hide the hatched region. Be sure this inside baffle doesn't interfere with 2-inch eyepieces or the Barlow lens. However, on many of the common low focusers nowadays, focuser baffling is impossible or ineffective. Too bad.
[Return to home page]
If there are any difficulties or comments about these pages, send e-mail (after removing the anti-advertising letter N and S from the beginning) to
NSsuiterhr@gmail.com
Last updated on Jun 2003, Copyright 1996 by H.R. Suiter